Posted on

History of Seat Belts – Brief Timeline of Key Events

Could you imagine buying an automobile without seat belts? It’s hard to believe that something we take for granted wasn’t always in every automobile. In fact, the earliest automobiles didn’t have seat belts at all and it wasn’t until the late 1950s that we first saw an auto manufacturer make them standard on their vehicles.

Below is a short timeline of some of the key events that helped make seat belts what they are today.

Mid-1800s – George Cayley is said to be the inventor of seat belts around this time.

1885 – Edward J. Claghorn is granted the first US patent (https://www.google.com/patents/US312085) for seat/safety belts. His design was not intended for automobiles.

1930s – Several US physicians install lap belts in their vehicles and start asking manufacturers to put them in new cars.

1950 – Nash offers seat belts as options in some of their vehicles.

1954 – The Sports Car Club of America requires lap belts for competing drivers.

1958 – Saab introduces seat belts as standard.

1958 – Nils Bohlin (Volvo’s first chief safety engineer) patents the first 3-point seatbelt.

1959 – Volvo makes the 3point seat belt standard in Sweden.

1968 – Seat belts are required in all new American vehicles

1970 – Victoria, Australia put the first seat belt law in place which required drivers and front-seat passengers to wear seat belts.

1984 – New York becomes the first US state to pass a law that required vehicle occupants to wear seat belts.

Posted on

How to Read Tires

Tires have a lot of information written on their sidewalls. It might not look like a lot at first, but each character has a meaning and communicates relevant information. Here is a breakdown of how to read a tire and what each character means.

Let’s use this as our tire example: P225/60R16  97S

Service/Tire Type – The first part of tire size explains the type of vehicle or service that the tire is designed for. Our example has ‘P’ which stands for PMetric and indicates that this tire is designed for a passenger vehicle. Other tire types are:

LT = Light Truck

ST = Special Trailer

T = Temporary

If there is no letter at the beginning then the tire is a Euro metric tire.

Tire Section Width – Next we have tire width. Our example has a width of ‘225’ which means that the tire measures 225 millimeters from sidewall to sidewall.

Aspect Ratio – After the / we have the aspect ratio which refers to the height of the sidewall. It tells you the sidewall height as a percentage of the section width of the tire which in our example is ’60’. This means that the sidewall height is 60% of the section width (225 millimeters in our example) which makes the sidewall height 135 millimeters.

Construction – The letter after the aspect ratio indicates the tire’s construction. In our example, we have the letter ‘R’ which stands for radial. This is the most common type of automotive tire with the other types being:

B = Bias Belt

D = Diagonal

Wheel/Rim Diameter – Next we have the wheel diameter which in our example is ’16’. This measurement is in inches which means that this tire will fit on a 16-inch wheel. There are some cases where this number can be expressed in millimeters (390 for example), but in most cases, it will be in inches.

Load Index – After the wheel diameter we have the load index which in our example is ’97’. This tells you how much weight the tire can support when properly inflated. The number itself doesn’t tell you how much weight it can support, but it corresponds with a certain carrying capacity. A load index of 97 means it can support 1609 pounds.

Speed Rating – This indicates the maximum speed at which this tire can be driven on when properly installed. In our example, we have a speed rating of ‘S’ which equates to a maximum speed of 112 mph (or 180 kmh).

Posted on

Taking a Picture of Each View of the Vehicle

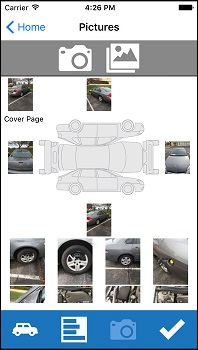
The ‘Pictures’ view of the InspectARide app has a drawing of a vehicle with several camera icons around it. This section is set up to make it easy for you to get a picture from each of the main views of the vehicle (driver side, front, passenger side, and rear). All you have to do is simply tap on one of the camera icons and it automatically pulls up your camera so you can snap a picture. Once you take the picture you have the option to take the picture for the next view which makes this process really fast!

If you don’t have a use for taking a picture of each view, no problem. You can simply leave the camera views blank, or if you prefer, you can go into the app ‘Settings’ and uncheck the box for ‘Show Car Layout’ to have this feature turned off.

11-5-16-iar-app-pictures-view